How to Install a Wire Seal Flange

Wire Seal flanges offer versatile solutions in ultra-high vacuum (UHV) settings, serving as reliable connections for fittings, valves, and instrumentation. Capable of operating across the same temperature and pressure ranges as CF flanges, Wire Seal flanges are particularly useful when tube dimensions exceed those of standard CF connections. The following guide is an installation manual for Wire Seal flanges, providing step-by-step instructions applicable for new installs or reinstallations following maintenance tasks.
Step 1: Surface Inspection of Wire Seal Flanges
Ensure that both flange surfaces are thoroughly clean and free from nicks or scratches. Any imperfections on the flange surfaces can compromise the joint’s sealing integrity.
Step 2: Prepare Bolts for Installation
Before beginning the installation process, it’s essential to apply high-temperature anti-seize to the bolts’ threads. This helps prevent corrosion and ensures easy removal in the future.
Step 3: Gasket Placement
With clean, lint-free gloves, carefully unpack the gasket. Place the gasket on the sealing area of the male flange, ensuring proper alignment and positioning for a secure seal.
Step 4: Combining Wire Seal Flange Sexes
Before proceeding further, ensure the female flange is added to complete the flange set. Carefully align the mating hole patterns of both the male and female flanges, ensuring a snug fit for a secure connection.
Proper alignment of the flanges is crucial for establishing a secure and leak-free joint. Take your time to ensure that the flanges are correctly combined and aligned before moving on to the next step in the installation process.
Step 5: Installing and Tightening Bolts
Begin by installing the bolts and hand-tightening them. Ensure that the flange faces remain parallel during this process. Once hand tight, the bolts are tightened in a clockwise pattern, gradually bringing the flanges metal to metal.
Torquing Bolts
Use a clockwise pattern for torquing the bolts, consulting the appropriate torque specs for the specific bolt size and flange diameter of your flanges. Refer to the torque table below for the recommended torque values based on the nominal outer diameter (O.D.) and bolt size.
Torque Table
| Nominal O.D. | Bolt Size | Max. Torque (Nm) |
|---|---|---|
|
12 in. (305 mm) |
3/8 - 24 |
29.4 |
|
14 in. (356 mm) |
3/8 - 24 |
29.4 |
|
17 in. (432 mm) |
1/2 - 20 |
61.1 |
|
19 in. (483 mm) |
1/2 - 20 |
61.1 |
|
22 in. (559 mm) |
5/8 - 18 |
140.6 |
|
27 in. (686 mm) |
5/8 - 18 |
140.6 |
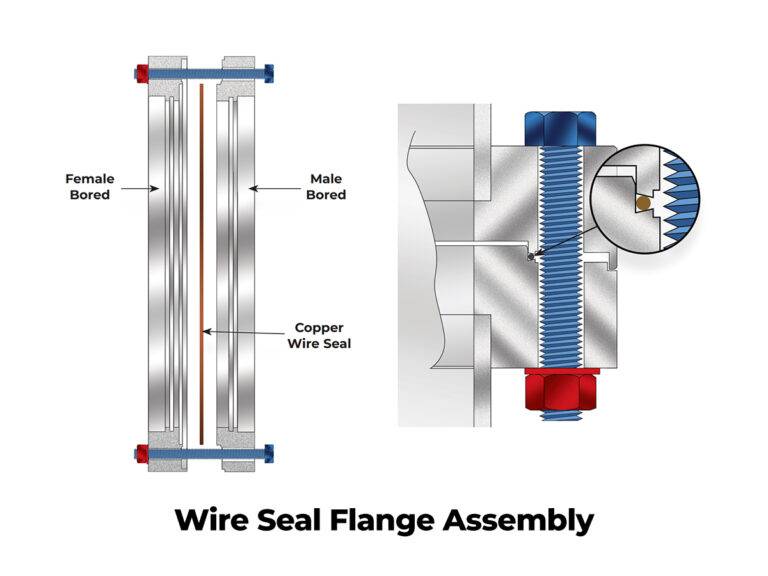
In Conclusion
Proper torquing while tightening the fastening bolts is critical in creating a reliable seal. This process applies a specific amount of pressure, which forces the knife-edges of the two Wire Seal flanges into the gasket, forming an annular groove. Under this pressure, the gasket material cold flows, effectively filling microscopic surface imperfections on the sealing knife-edges. The result is a vacuum-tight seal capable of withstanding extreme temperatures ranging from -200°C to 450°C and pressures as low as 1X10-13 Torr.
If you have any questions or require further assistance in installing your Wire Seal flanges, please contact an ANCORP representative using one of our many convenient contact methods, such as a form, live chat, or phone call.